Rsync
脚本修改ip和hostname
下面的128是IP地址的最后一个比如192.168.220.128,那么其他的机器就是根据128进行克隆得到的,然后执行脚本进行替换128。
#!/bin/sh
if [ $# -ne 2 ];then
  echo "/bin/sh $0 hostname PartIP"
  exit 1
fi
hostnamectl set-hostname $1 #第一个参数
sed -i "/IPADDR/s#128#$2#g"  /etc/sysconfig/network-scripts/ifcfg-ens33 #<==模板机IP最后8位默认是200。
systemctl restart network
#check
hostname
exit

#sh net.sh hadoop2  129
#sh net.sh hadoop3  130
ssh优化
vim /etc/ssh/sshd_config
Port 52113
ListenAddress 172.16.1.7:52113
PermitRootLogin no
PermitEmptyPasswords no
UseDNS no
GSSAPIAuthentication no

0.0.0.0:22 表示sshd服务监听任意网卡,监听所有IP请求。
重启服务
systemctl restart sshd
配置主机域名
cat >/etc/hosts<<EOF
127.0.0.1    localhost localhost.localdomain localhost4 localhost4.localdomain4
::1          localhost localhost.localdomain localhost6 localhost6.localdomain6
192.168.220.128 hadoop1
192.168.220.129 hadoop2
192.168.220.130 hadoop3
192.168.220.131 hadoop4
192.168.220.132 hadoop5
EOF
rsync 的使用
普通使用
yum install -y rsync
语法:
push,推:从本地推到远端。
rsync       [OPTION...]   SRC...     [USER@]HOST:[DEST]
rsync命令 参数选项    本地路径 [认证用户]@[主机地址]:[目标路径]

push实践:
没用隧道:
rsync -avz /etc/hosts root@172.16.1.31:/opt/ #加密传输,限制root。
rsync -avz /etc/hosts bigdata@172.16.1.31:/tmp/ #加密传输,限制root。
使用隧道;
rsync -avz /etc/hosts -e "ssh -p 22" root@172.16.1.31:/opt/
rsync -avz /etc -e "ssh -p 22" bigdata@172.16.1.31:/tmp/
#上述命令是等价的。-e 指定通道  ssh ssh服务连接客户端  -p 22指定22端口。

拉的命令:
rsync -avz root@172.16.1.41:/opt/hosts /opt
rsync -avz -e "ssh -p 22" root@172.16.1.41:/opt/hosts /opt
配置ssh免密
ssh-keygen
ssh-copy-id hadoop1
ssh-copy-id hadoop2
ssh-copy-id hadoop3
ssh-copy-id hadoop4
ssh-copy-id hadoop5
推模式
rsync -avz /etc/hosts root@hadoop2:/opt/

rsync -avz /etc/hosts -e "ssh -p 22" root@hadoop2:/opt/
拉模式
rsync -avz root@hadoop2:/opt/hosts /opt

rsync -avz -e "ssh -p 22" root@hadoop2:/opt/hosts /opt
本地无差异同步
rsync -avz --delete root@hadoop2:/opt/ /opt
复制限速
rsync -avz --bwlimit=1 root@hadoop2:/opt/ /opt
Sersync实时同步
相关网站
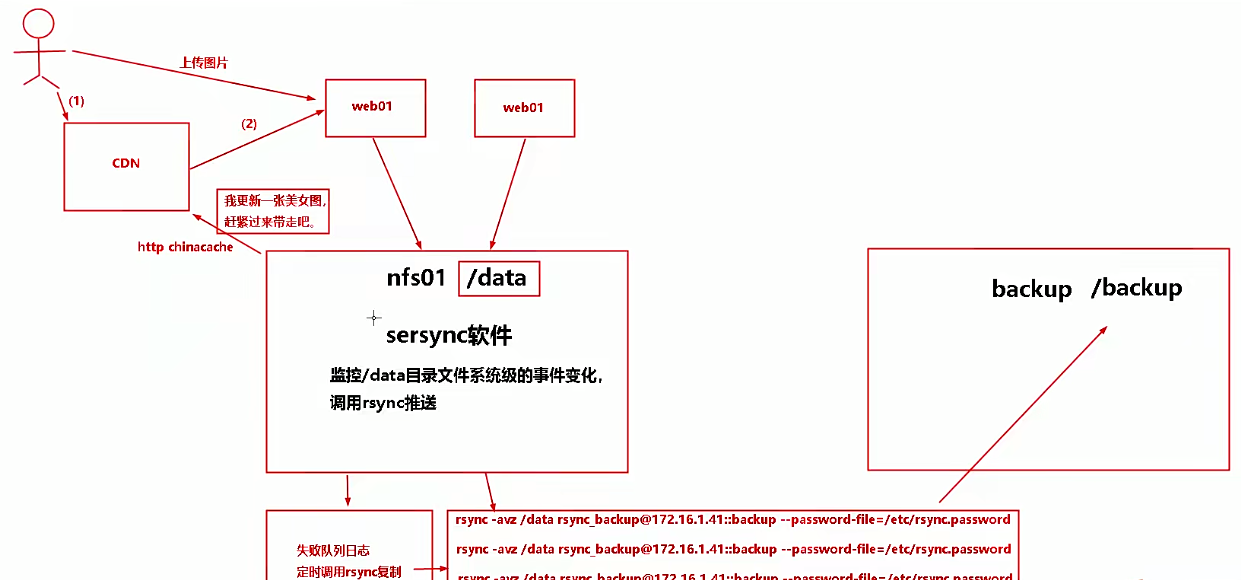
rsync+sersync
- sersync可以记录被监听目录中发生变化的(增,删,改)具体某个文件或目录的名字;
- rsync在同步时,只同步发生变化的文件或目录(每次发生变化的数据相对整个同步目录数据来说很小,rsync在遍历查找对比文件时,速度很快),因此效率很高。
部署rsync服务(rsync-server服务器上配置)
| ip | 角色 |
|---|---|
| 192.168.220.128 | rsync-client |
| 192.168.220.129 | rsync-server |
- 部署rsync服务(rsync-server服务器上配置)
yum install rsync -y #安装rsync,如果嫌yum版本过低也可以源码安装
- 默认rsync没有配置文件,创建一个,文件中#和汉字仅为注释,使用中请将所有注释清除
vim /etc/rsyncd.conf
uid = root
gid = root
use chroot = no
max connections = 2000
timeout = 600
pid file =/var/run/rsyncd.pid
lock file =/var/run/rsync.lock
log file = /var/log/rsyncd.log
ignore errors
read only = false
list = false
hosts allow = 192.168.0.0/16
auth users = rsync_backup
secrets file =/etc/rsync.password

[www]
comment = www
path = /data/www/

[bbs]
comment = bbs
path = /data/bbs/

[blog]
comment = blog
path = /data/blog/
#rsync_config____________end
#Rsync server
uid = root
gid = root
use chroot = no                         # 安全相关
max connections = 2000                  # 并发连接数
timeout = 600                           # 超时时间(秒)
pid file =/var/run/rsyncd.pid           # 指定rsync的pid目录
lock file =/var/run/rsync.lock          # 指定rsync的锁文件【重要】
log file = /var/log/rsyncd.log          # 指定rsync的日志目录
ignore errors                             #忽略一些I/O错误
read only = false                       #设置rsync服务端文件为读写权限
list = false                            #不显示rsync服务端资源列表
hosts allow = 192.168.0.0/16               #允许进行数据同步的客户端IP地址,可以设置多个,用英文状态下逗号隔开
#hosts deny = 0.0.0.0/32                 #禁止数据同步的客户端IP地址,可以设置多个,用英文状态下逗号隔开
auth users = rsync_backup               #执行数据同步的用户名,可以设置多个,用英文状态下逗号隔开
secrets file =/etc/rsync.password       #用户认证配置文件,里面保存用户名称和密码
#################################################
[www]                                   # 模块
comment = www
path = /data/www/
#################################################
[bbs]
comment = bbs
path = /data/bbs/
#################################################
[blog]
comment = blog
path = /data/blog/
#rsync_config____________end
- 创建用户认证文件
echo "rsync_backup:123456">/etc/rsync.password #配置文件,添加以下内容
- 设置文件权限
chmod 600 /etc/rsync.password
- 启动守护进程,并写入开机自启动
rsync --daemon  #可以使用--config= 指定非标准路径下的配置文件
vim /etc/rc.local
# rsync server progress
/usr/bin/rsync --daemon
- 检查是否启动成功
ps -ef | grep sync | grep -v grep
root       7521      1  0 11:39 ?        00:00:00 /usr/bin/rsync --daemon --no-detach

netstat -lntup | grep rsync
tcp        0      0 0.0.0.0:873             0.0.0.0:*               LISTEN      7521/rsync
tcp6       0      0 :::873                  :::*                    LISTEN      7521/rsync
- 创建相关待同步的目录
mkdir -p /data/{www,bbs,blog}
rsync-client客户端配置
安装rsync,方法同上
创建rsync配置文件,客户端创建即可,无需内容
touch /etc/rsyncd.conf
- 配置rsync客户端相关权限认证:
 echo "123456">/etc/rsync.password
 chmod 600 /etc/rsync.password
- 创建待同步数据,在客户端创建一些数据
mkdir -p /data/{www,bbs,blog}
touch /data/www/www.log /data/bbs/bbs.log  /data/blog/blog.log
- 测试rsync是否同步
cd /data/www/
touch {1..3}.txt
#/data/www/表示本地需要同步的数据目录  rsync_backup@192.168.220.129::www表示服务端的指定名称的模块下  本条命令执行的操作为:将第一个路径参数下的文件同步到第二个路径参数下  即:推模式 调换路径则为:拉模式
rsync  -avzP /data/www/ rsync_backup@192.168.220.129::www/   --password-file=/etc/rsync.password

sending incremental file list
./
1.txt              0 100%    0.00kB/s    0:00:00 (xfr#1, to-chk=2/4)
2.txt              0 100%    0.00kB/s    0:00:00 (xfr#2, to-chk=1/4)
3.txt
              0 100%    0.00kB/s    0:00:00 (xfr#3, to-chk=0/4)
sent 207 bytes  received 84 bytes  582.00 bytes/sec
total size is 0  speedup is 0.00

#rsync  -avzP /data/www rsync://rsync_backup@172.16.150.131/data/www   --password-file=/etc/rsync.password 第二种方法,直接指定路径
#rsync  -avzP /data/www rsync://rsync_backup@172.16.150.131/data/www/   --password-file=/etc/rsync.password #test为服务器上的目录
参数: --delete 无差异同步
          --bwlimit=KB/S  限速
           --exclude=PATTERN       exclude files matching PATTERN
           --exclude-from=FILE     read exclude patterns from FILE
           --include=PATTERN       don’t exclude files matching PATTERN
           --include-from=FILE     read include patterns from FILE
#此步骤必须成功才能进行下一步
开始部署sersync服务(rsync-client上)
百度网盘链接: https://pan.baidu.com/s/11yL6HtZsblkZR8vSSIvzrw 提取码: tdam
tar -zxvf sersync_64bit_20160928.tar.gz -C /usr/local/
cd /usr/local/application
- 配置sersync
cp sersync/conf/confxml.xml  sersync/conf/confxml.xml-bak
vim  sersync/conf/confxml.xml
修改24--28行
 24         <localpath watch="/opt/tongbu">
 25             <remote ip="127.0.0.1" name="tongbu1"/>
 26             <!--<remote ip="192.168.8.39" name="tongbu"/>-->
 27             <!--<remote ip="192.168.8.40" name="tongbu"/>-->
 28         </localpath>
修改后的内容为:192.168.220.129 远程服务地址,www为远程模块名称
     <localpath watch="/data/www">
             <remote ip="192.168.220.129" name="www"/>
     </localpath>

修改29--35行,认证部分(rsync密码认证)
29         <rsync>
30             <commonParams params="-artuz"/>
31             <auth start="false" users="root" passwordfile="/etc/rsync.pas"/>
32             <userDefinedPort start="false" port="874"/><!-- port=874 -->
33             <timeout start="false" time="100"/><!-- timeout=100 -->
34             <ssh start="false"/>
35         </rsync>

修改后的内容如下:
    <rsync>
        <commonParams params="-artuz"/>
        <auth start="true" users="rsync_backup" passwordfile="/etc/rsync.password"/>
        <userDefinedPort start="false" port="873"/>
        <timeout start="true" time="100"/>
        <ssh start="false"/>
    </rsync>
上面的873是server端的服务端口,rsync_backup是server端的auth users用户
netstat -lntup | grep rsync
tcp        0      0 0.0.0.0:873             0.0.0.0:*               LISTEN      7521/rsync
tcp6       0      0 :::873                  :::*                    LISTEN      7521/rsync
- 开启sersync守护进程同步数据
/usr/local/application/application/sersync/bin/sersync -d -r -o /usr/local/application/application/sersync/conf/confxml.xml
执行以后打印如下
set the system param
execute:echo 50000000 > /proc/sys/fs/inotify/max_user_watches
execute:echo 327679 > /proc/sys/fs/inotify/max_queued_events
parse the command param
option: -d      run as a daemon
option: -r      rsync all the local files to the remote servers before the sersync work
option: -o      config xml name:  /usr/local/application/application/sersync/conf/confxml.xml
daemon thread num: 10
parse xml config file
host ip : localhost  host port: 8008
daemon start,sersync run behind the console
use rsync password-file :
user is rsync_backup
passwordfile is      /etc/rsync.password
config xml parse success
please set /etc/rsyncd.conf max connections=0 Manually
sersync working thread 12  = 1(primary thread) + 1(fail retry thread) + 10(daemon sub threads)
Max threads numbers is: 22 = 12(Thread pool nums) + 10(Sub threads)
please according your cpu ,use -n param to adjust the cpu rate
------------------------------------------
rsync the directory recursivly to the remote servers once
working please wait...
execute command: cd /data/www && rsync -artuz -R --delete ./  --timeout=100 rsync_backup@192.168.220.129::www --password-file=/etc/rsync.password >/dev/null 2>&1
run the sersync:
watch path is: /data/www
- 测试同步
cd /data/www/
echo "zyt66" > anzhanghoa.txt
在client端执行以后,在server端就可以看到实时同步结果了。
多实例情况
1、配置多个confxml.xml文件(比如:www、bbs、blog....等等)
    confxml-bbs.xml  confxml-blog.xml  confxml-www.xml(按照单个实例配置即可)
    2、根据不同的需求同步对应的实例文件
    rsync -avzP /data/www/ rsync_backup@10.1.20.109::www/   --password-file=/etc/rsync.password
    rsync -avzP /data/bbs/ rsync_backup@10.1.20.109::bbs/   --password-file=/etc/rsync.password
    rsync -avzP /data/test/ rsync_backup@10.1.20.109::blog/   --password-file=/etc/rsync.passwor
分别启动即可